Wednesday 14 May 2014

Step by Step guide to Sewing with Vintage Sewing Patterns

I've never had formal training in Dressmaking.  My Mum and Nan both taught me the basic techniques and I remember making a knitting bag in the first year of secondary school, with a cat appliqué on the front that EVERYONE said it looked more like a squirrel :-/  I also made a very useful and highly decorative tray liner in primary school.  But that's it.  Nothing more!  However, this is exactly what I enjoy about sewing. For me, it is a process of problem solving.  Much like how other people enjoy completing a crossword, I could quite easily spend a relaxing afternoon deciphering a pre-war pattern.  How do the pieces fit together, what is the sequence?  

This is my process, it works for me!...

Step one - Carefully open the packet!
I always feel extra excited when the pattern I am using it still 'factory folded' and unused.  This poor little pattern had been all but forgotten since the early 1950's when it was printed.  It is a boy's 'Buster Suit' in three different options.  Buster Suit where named after a 1920's comic strip character 'Buster Brown', who wore high necked military blouse that buttoned to shorts or 'knickers'.  


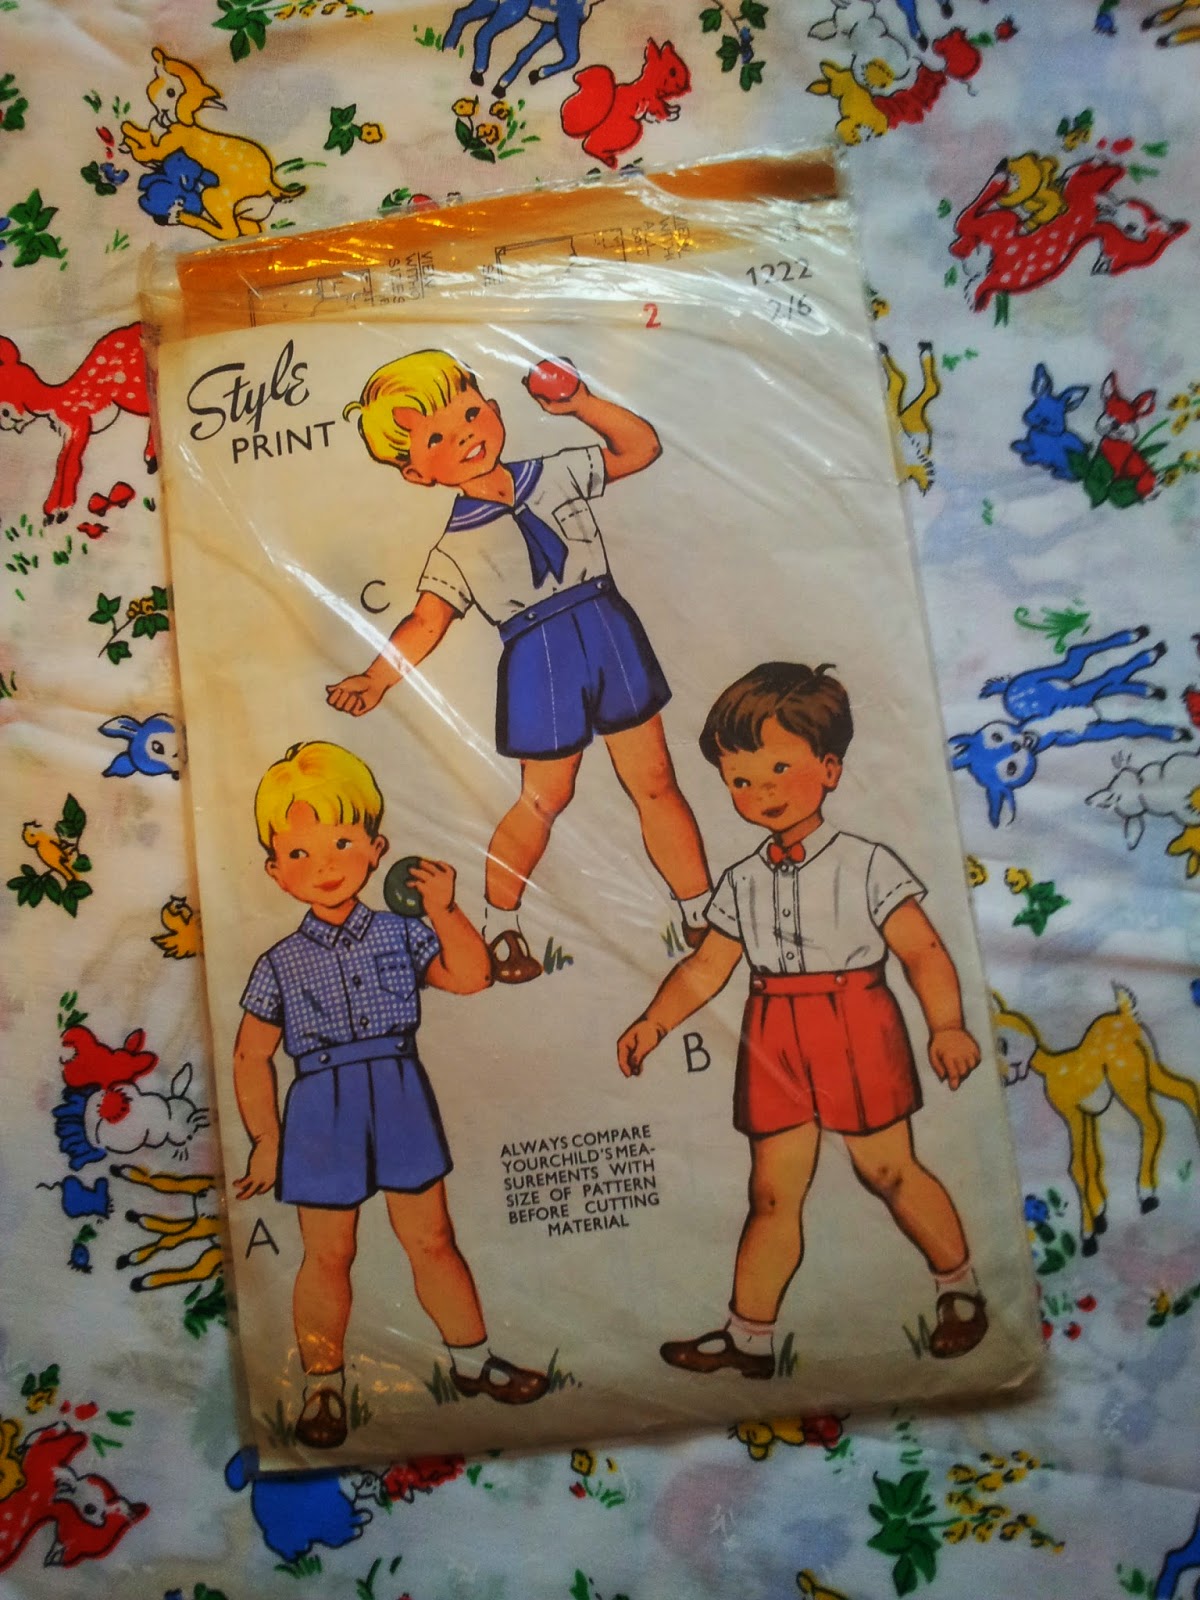
I've decided to go for the sailor suit version C.  I have a thing for sailor suits at the moment! Originally popular during the reign of Queen Victoria, they were worn for play and often made from tough cotton twill. Nowadays they seem to be reserved for special occasions, such as christenings and are very often worn by babies.  That's a shame.  These suits are very comfortable to play in.  There's no tight or restricting waistband, the loose cotton shirt is cool and comfortable.

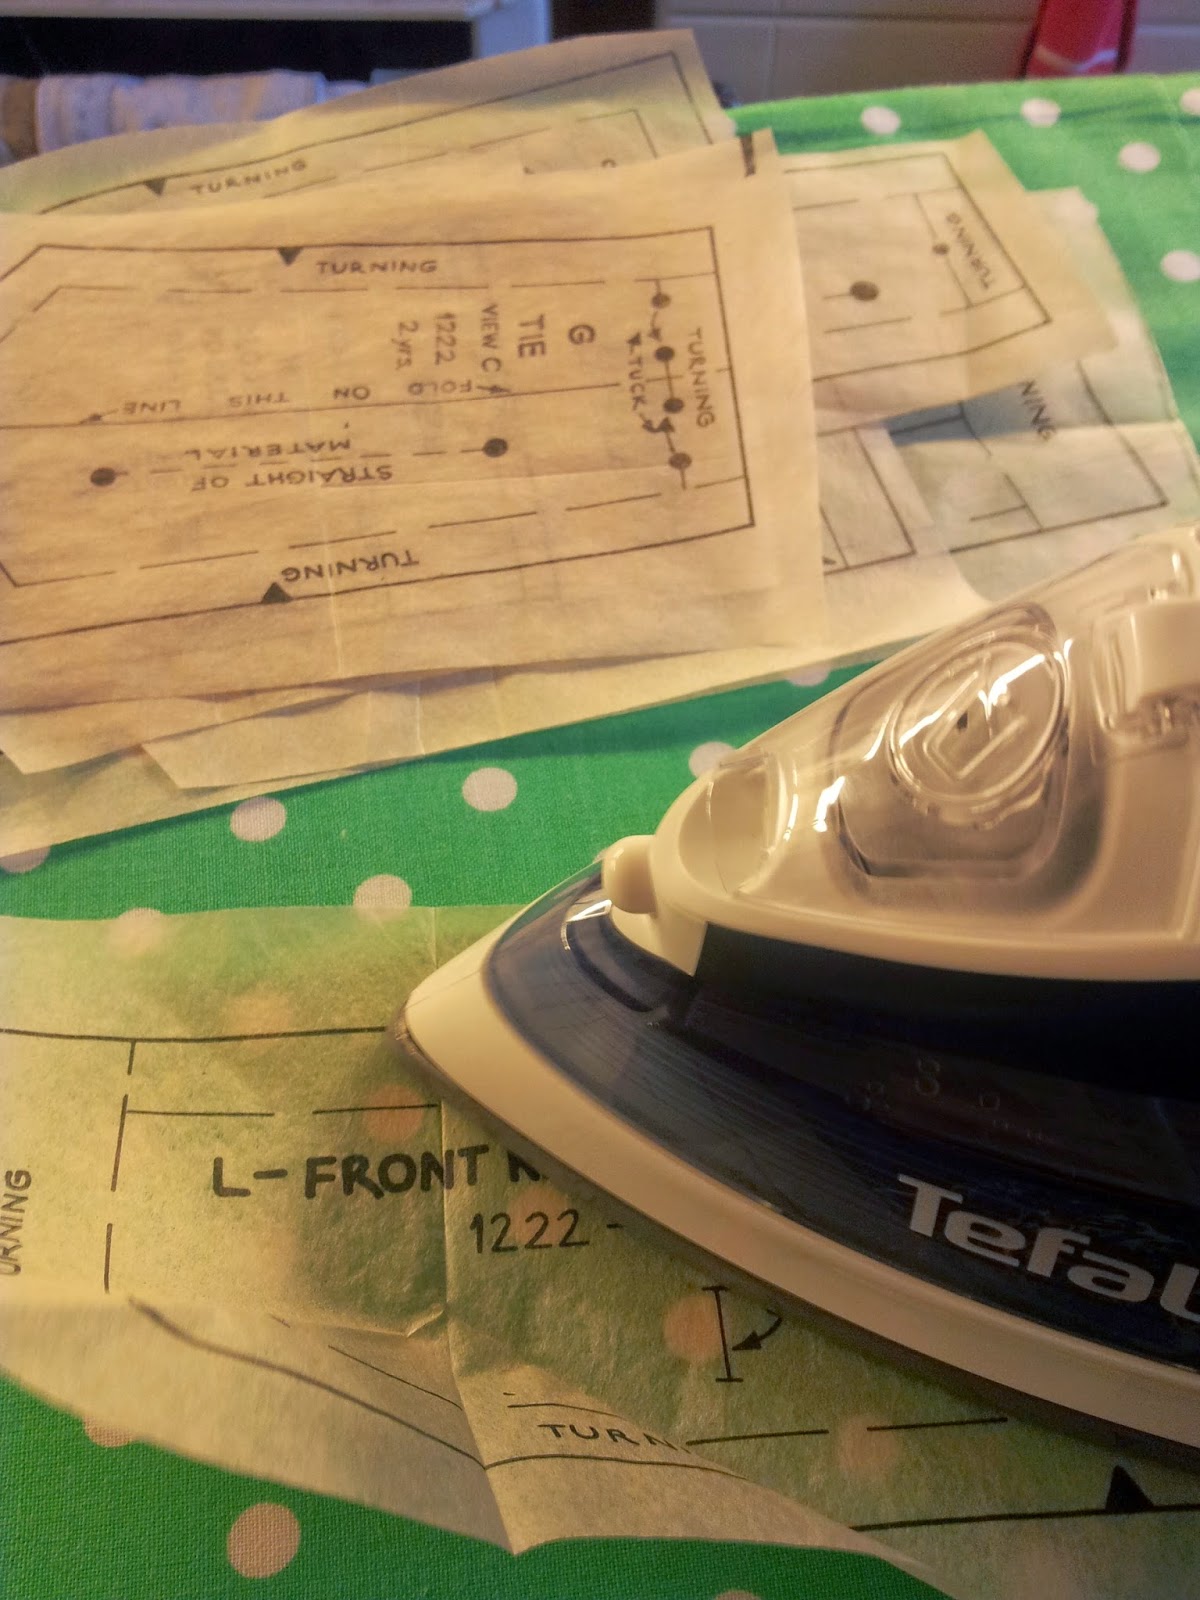
Step two - iron the pattern pieces

Yep, iron the pattern pieces.  I've learnt this the hard way.  After decades scrunched at the back of a drawer or cupboard, vintage patterns can become distorted.  You would be amazed how much a pattern can change shape after a good pressing.  Especially if the pattern has folded like a concertina.  

Remember, no steam!
Step Three
... while your iron is on you might as well press your fabric!  I like to pre-shrink my fabric, especially if I am using 100% cottons.  I know this seems like a waste of time, as the fabric is crisps and pristine from the shop but I know from bitter experience how fabrics can shrink, warp and pucker after their first wash, after you have spent weeks constructing the item!

Step Four
Lay out your pattern pieces as per the instructions.  Well, as long as you have the grain line in running in the right direction and put the right pieces on the folded edge, you can have a little play here. I don't pin until everything in laid out in draft.  Then pray that no one opens a window ...!

Weights can be really useful - this bean tortoise doubles up as a pin cushion!

Step Five
Pin in place.  I also like to measure the grain line marking on the pattern to see if it’s in line with with edge of the fabric.  Not so important on small shorts but a misaligned line could cause a trouser leg to twist or a pattern to wander off course.  

I love this ruler, I still can't memorise them all though!


Step Six
‘Measure twice, cut once!’ is my mantra!  I was taught that by my old woodwork teacher.  This is especially so when using expensive or rare hard to find vintage fabric.  Cut it wrong and you’ll be making a patchwork quilt.  When I cut my pattern pieces, I always cut the notched outwards.  I'm not sure if you are meant to do this but by cutting inwards, you risk cutting into the main body of the fabric and causing unsightly nicks.  Or worse, areas of weakness that could fray and tear - not ideal in children’s clothing.
I don't want to cut this pattern so I still have the option of making up the other version.  I used a pattern wheel to mark the fabric without altering the fabric.


Step Seven

Tailor tacks!  I love tailor tacks and can’t understand why people will skip this part.  I know you can use chalk but I find this either rubs off or becomes an undefined smudge or never, EVER rubs off.  Disappearing ink in great - providing you are sewing within the next nanosecond and not working under any sort of lighting! Call me old fashioned but I jump at the chance of any hand sewing.  

Step Eight
Unless under a strict deadline - and sewing is never fun under pressure - I leave it there.  Yep, no more tonight!  I have to be strict about this.  I would love to keep going, but then time becomes an issue as well as tiredness.  And then corners are cut (literally sometimes oops!), mistakes are made.  Best to leave it there and be bright eyed and bushy tailed for work tomorrow morning. This has taken me an hour, which has been a great de-stress from the day! I’ll keep the instructions out as now I have cut the pieces, I can have a better idea in my mind how to construct the piece.  


Bedtime reading!

Monday 30 September 2013

I ♥ my vintage coachbuilt pram - 10 reasons to have a traditional pram

What will I do when Joseff grows out of his coachbuilt pram?!  
"Easter Bunnies"

I didn't have a 'big pram' for my first baby, instead I had a pramette travel system that, although looked stylish and modern, I was never really completely happy with.  Mostly, it was the fact that my baby, a healthy 7lbs 14 1/2 always looked 'scrunched' in it!  When I was pregnant with my second baby, my mum started a new hobby - restoring silvercross dolls prams.  Which got me thinking... when I was little, I always assumed I'd get a 'proper pram'.  Admittedly, the travel systems weren't really around then but seeing these relics from my child hood (and probably a good mix of pregnancy hormones) made me pine! 
The obvious place to start was Ebay, spoilt for choice and almost too much to decipher to I began to ask around. Silvercross was the obvious choice, of course everyone refer to these prams as 'Silvercross' but there are many other makes and models around that do not carry the Silvercross price tag. I hadn't heard of Marmet before, but the name came up quite often in conversation.  Apparently, the brown version was the 'must-have' of the 70's!  One came up on Ebay with sun canopy, shopping tray and toddler seat for £200 - sold!  So excited when it arrived.  The chrome was completely rust free and only one tiny scratch on the body work.  Also, there was a date stamp on the inside from 1988 and therefore conformed to safety standards of the day.  The really old prams are padded out with horse hair and lord know's what else.  So the pram was carefully cleaned with 'showroom shine' waterless cleaner normally reserved for my dad's pride and joy, his car.  

So this is what I have learned about owning a coachbuilt pram - 
  • Home from Home - When we bought the pram, we didn't envision taking it on holiday!  However, when Joseff was 12 weeks we went on a family break to Bluestone park in Wales.  Rather than use a rented cot or take a travel cot with us (not a very comfortable mattress) we took the pram.  Not only did Joseff safely sleep in it all night (being wheeled from room to room undisturbed when we visited friends) but he was safe and comfortable in restaurants where he could be parked in a corner, high enough to see and not too low that there was a danger of hot things being spilt on him.

  • Fresh Air is Good For You - ok, not usually do we get the weather we have had this summer, but boy, what a good summer! Joseff sat for hours out in the garden, sun canopy up, watching the world go by.  With the back rest up, he could watch his big brother playing and plan all the things he could do when he was a big boy too.
"Lazy Sunday Afternoon"
  • Flat Out - Comfort, pure comfort.  The baby is able to sleep with his back completely flat.  There is space for them to move their arms and legs.  I bought a square end cradle mattress from BabiesRus but you can buy specialist matress that fold where the back rest lifts.  I prefer the completely flat one though, so there are no creases in the mattress.  

"Mummy's Little Helper"
  • Play Pen on Wheels - ok, so I have mentioned the space before, but really, they are so roomy!  I have used this pram outside and inside the house in equal measures.  My pram lives in the kitchen and it has almost become routine that Jojo sits and watches me make the dinner while surrounded by his favourite toys.  Yes, the toys inevitably end up on the floor, but he is happy and so am I.  It's lovely having company and listening to the coos and chirps but I'm still getting stuff done too (I once considered buying a baby sling purely to polish and hoover as my little cherub was going through a clingy stage).  Even now, aged 16 months he'll point to his pram and want to go in although that may be due to the fact he has learnt how to rock it all by himself!

  • Why Walk When You Can Cruise? Hopefully by now I have put across how comfy it is for the baby - and I haven't even got to the gentle rocking motion yet!  The coachbuilt suspension gently glides as you walk and certainly doesn't rattle around like the buggy type wheels.  Having large wheels also means that it does not bounce on every little pebble.   Being high up, the baby can see the world around them as well as having complete eye contact with you!  This also means that the baby is also out of the exhaust fumes of passing traffic, and on one occasion, a very excited doggy!

  • “But the beauty is in the walking -- we are betrayed by destinations.” ― Gwyn Thomas.  There's nothing like pushing your baby in a coachbuilt pram!  At a slight disadvantage as my village has only one pavement, we have still covered miles.  The high handle bar allows you to walk elegantly upright with a straight back.  You can chatter away to your little prince while out having to bend or crouch. 

  • Away for the Day! Another advantage I didn't foresee before I bought the pram but this pram can carry more than a pack horse! A whole day at the seaside and we didn't have to go back to the car once.  The shopping tray underneath was large enough to carry a picnic cooler bag, buckets, spades, toy tractor and diggers, bathing clothes, jelly shoes and towels for a family of four (ok, so the littlest didn't need any of those but impressive none the less).  The nappy bag clipped onto the pram body and carried all the baby supplies.  Joseff had a day in comfort, cool in the spacious pram safely protected under the hood from the mid day sun.  The pram even doubled up as a changing unit after one particularly gruesome nappy explosion...

  • Babies should look like babies! Dressing a vintage coachbuilt pram is the perfect excuse for dusting off the knitting needles and oiling up the sewing machine.  Surrounding your little lord or princess in lovingly handmade luxury will keep the mind ticking over during the 'baby brain' months. 

  • Get Your Moneys Worth! It does depend on the make and model of your pram of course, but these prams are built to last!  Ask your mother, aunts, grandmothers and see how many times a family heirloom was passed around before the travel systems became the vogue.  My pram dates from 1988 and still looks as good as new.  It will still be ok in another quarter century providing it is carefully stored.  My pramette system disintegrated outside the doctors surgery at my babies 8 week check (this was a designer high street brand too, with an expensive price tag).  It had only been used for a year before it was carefully stored away.  So as well as doubling up as a cot, travel cot, play pen, change unit and trolley it will last for generations too. 

  • Retail Therapy! I never got to 'browse' with my first baby, one foot into Monsoon and there was a complete meltdown.  But with this pram, Joseff is so comfortable and surrounded by an abundance of toys, that he will quiet happily allow me to shop even around the most girly of department stores.  Of course, having admiring grannies entertain him at every turn helps, even if they do admire the pram more than my baby!  You might expect it to be a difficult pram to use but in fact, most stores now have disabled access and wide aisle which is ample space for the pram.  Being high up, Joseff isn't constantly flicked in the face but merchandise and jabbed by shopping bags.  The large shopping tray is large enough for the most die hard shopper, without any danger of the pram tipping over like a buck-a-roo just tipped past the limit.  
And of course, they are beautiful.  Elegant styling with timeless charm, 'a thing of beauty is a joy for ever' 


"Watching the World Go By"
See my instagram page for more photographs of my pram http://instagram.com/jacpwca

Sunday 29 September 2013

Debbie Bliss '18 Lederhosen' for Joseff

Well, I vowed not to knit again but this pattern was far too cute not to give it another go.  I was reasonably straight forward, garter and stocking stitch with only a little shaping for the legs.    I used the recommended wool which although is pricey, certainly looks good and was lovely to knit with.  I had trouble looking for a boyish woven ribbon - I didn't want a printed one to fade in the wash - but eventually this gorgeous tractor ribbon came up on my ebay saved searches.  Can't wait to get Joseff's cute podgy baby legs into this little number!  I'll post some photos of Jojo wearing them, baby temperament depending ....

Thursday 26 September 2013

Rockabilly Boy 'baba-jo' Jacket and Cap (available to order)

OoooOooooo can't wait to try this little outfit on Jojo! An absolute joy to make, lots of fiddly bits and challenges.  I love the giant 'choccy buttons' I found in my vintage button box and I even had exactly the right amount - that never happens! I quickly tried the hat on Jojo while he was transfixed on 'In the Night Garden' and it looked very cute.  I'm very tempted to make a lumber jack version, with a red and black check fleece fabric with a black woolly lining. This jacket is available to order, please contact me for more information!

Tuesday 10 September 2013

50's Rockabilly Boy Crawler Suit and Top (available to order)

Ta - Da! The finished product ...


 Cool and comfortable, Joseff has worn this cute little outfit quite a few times now and has had many compliments!


The shirt I had made before, so I was quite confident and it took no time at all to make.  The only difficulty was the placement of the pattern pieces on such a wide check.  I wanted the collar to look balanced and the buttons - cute little baseball caps - to stand out.


All the seams in the shirt are 'flat felled', making them durable and tough.  I also think that they are much more comfortable as they lay flat and do not 'tickle' as my 5 year old informs me that some clothes do! (my delicate flower).


So then onto the crawler overalls.  I have use a soft needlecord with a very slight stretch.   Again, all the seams are felled for added strength.  


I wanted to tie in the shirt somehow but the baseball cap buttons just looked odd, so I have used the gingham check of the shirt to edge and reinforce the top of the bib front.  And I really wanted to have a play with my new bias binding maker!


The pattern suggested hammer on snaps but these make me very nervous around babies and tots.  I'm always worried that they will come away and find their way into a curious little mouth.  Luckily, I have of snap tape from a huge goodie bag I bought for £5 at Abakhan - bargain!  However, not easy to sew.  Even with a zipper foot the needle was all over the place and the tape seemed very thin - perhaps for professionals only :-(


I delve into the depths of my button box revealed these vintage buttons that compliment the fabric well but are flat enough to be worn under the shirt.


and there we are!  If you like this outfit and would like to purchase I would be very happy to make this to order.  It is size 1, but is very generously sized.  Contact me for more details :-)

As it's impossible to get Jojo to stay still for a photo, here are a few more of the outfit!  


"no photos please"
very, very durable!


I love the cute shaped of this outfit
photo-bombed by big bro!


"ooooo, do I dare to touch my big brother new toy?!"


Wednesday 7 August 2013

It's Sew Wednesday!

http://instagram.com/p/cuTOadC5_K/

Jojo wore his 'cars' version of this shirt today and he was so comfy and looked very dapper! It's loose fitting, allowing lots of room for playing, climbing, crawling and toddling ♥

I have preshrunk this over sized light blue check gingham,  want to play around with scale. These buttons should look really cute too!

... calling it a night as it's officially tomorrow morning!  All seems have been felled, two sleeves set and just the side seam and hem to do! And the buttons of course!

Tuesday 6 August 2013